This page will guide you through to set up service on Chromebooks (Chrome OS) or devices that are running on Chromium OS.
Please note that whilst the instructions below were written based on Neverware CloudReady build and tested successfully both on this and the ArnoldTheBat version, the instructions might differ compared to other Chromium OS builds.
Note: Chromium OS shares the same foundation as Chrome OS (found in Chromebook), with an exception of a few added features that's found only in Chrome OS, which is officially maintained by Google.
Step 1: Check the SimpleTelly settings on website
Login to our website, www.simpletelly.com from your Chrome browser and you should be redirected to the Client Area page.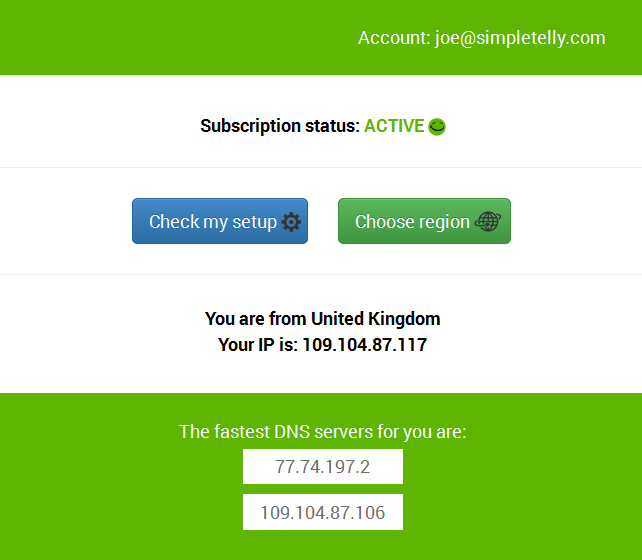
Take note of the fastest DNS server addresses that appear on screen.
Note: The DNS addresses shown in the picture above are just examples. Please follow the ones displayed on your own screen.
Step 2: SimpleTelly Configuration on Chromebook / Chromium OS
-
Click the status area at the bottom of your screen, where your account picture is located. Select Connected to ... and please take note of the name of the network.

- You will see the name of the network that you are currently connected to on top of the list of available connections. Below the list, click on Settings...

- On the Settings page, in the Internet connection section, click on the network drop down menu and select your active network.

- Click on the Network tab, and look for the Automatic name servers option. It should be selected by default.

- Select Custom name servers and then enter the fastest DNS servers addresses as recommend on our website into the Server 1 and Server 2 boxes.

Note: The DNS addresses shown in the picture above are just examples. Please follow the ones displayed on your own screen.
- Click the Close button to save the changes made.
Step 3: Register DNS on Network
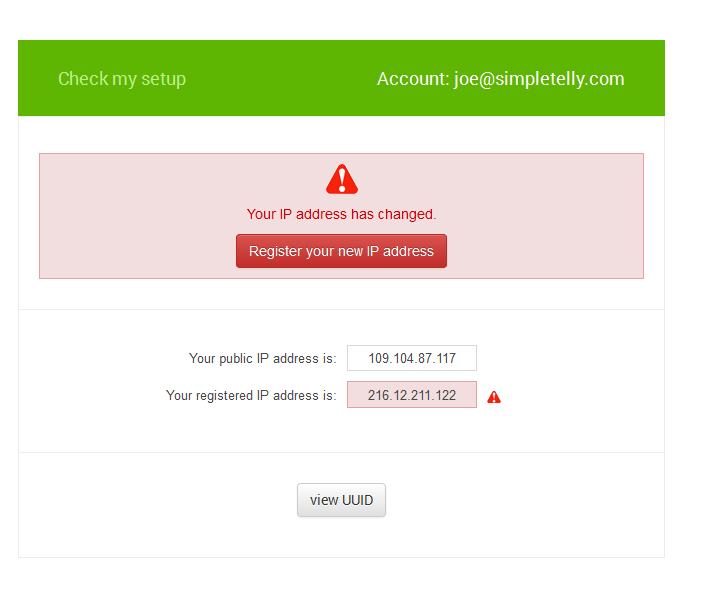
- Once you have done that, go back to your account page from your device and click on the Check my setup button.
Note: The DNS addresses shown in the picture above are just examples. Please follow the ones displayed on your own screen.
- If this is the first time you are setting up the service from this location, you will probably need to register your current IP address. Click on Register your new IP address.
- You will get Everything's OK! message on your screen if your IP has been registered successfully in our system.
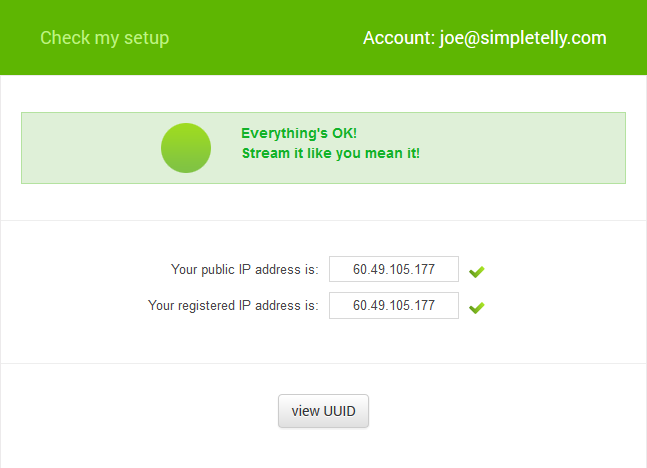
Note: You will not have to do it again unless your IP address changes. Also, any device on the same network will be able to use the service as long as you've set our DNS in their settings.
Now that you have setup and registered your system you can go ahead and access the TV site of your choice and stream it like you mean it!
For the full list of supported channels, please refer to our Supported Services page.
Any Problems?
Unfortunately it doesn't always go to plan!
If you are having problems please email us at support@simpletelly.com and we will do our best to assist you.